
These Halloween sugar cookies are cheerful, simple to make, and perfect for seasonal treats. Using a candy corn shaped cutter, a reliable sugar cookie dough, and royal icing, you can decorate a batch of jack-o-lantern treat-bucket cookies that look impressive but are beginner friendly. Follow the step-by-step instructions and photos to get consistent results and plenty of decorating options.

After a long break from blogging, coming back to Halloween recipes felt like returning to a favorite hobby—especially sugar cookie decorating. There’s something satisfying about watching a simple cookie take shape with icing and personality. This treat-bucket cookie design is an easy introduction to decorated sugar cookies: it uses a common cutter, only a few icing colors, one icing consistency, and leaves space for creative variation in the faces and finishes.
How to make these Halloween sugar cookies
First, make the sugar cookie dough.
Prepare a butter-and-flour based sugar cookie dough and chill it before rolling. Once your dough is made, flatten it into a disc, wrap it tightly, and refrigerate for at least one hour. Chilling keeps the dough firm, prevents excessive spreading, and makes it easier to roll.
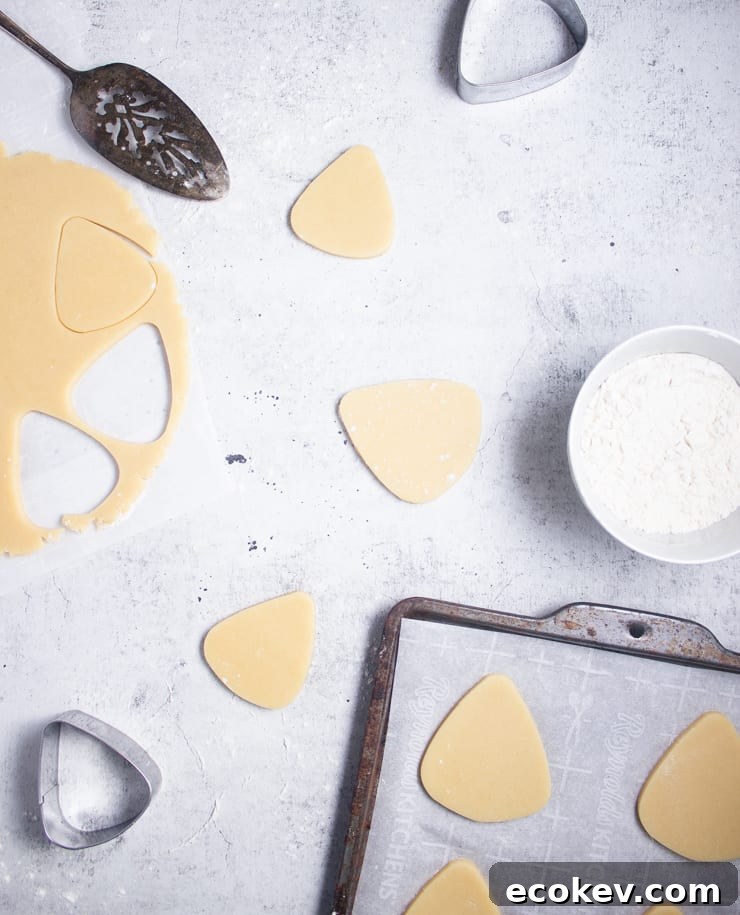
When chilled, knead the dough briefly on a lightly floured surface to make it pliable. Roll it to about 1/4″ (6 mm) thickness and cut shapes with a candy corn or treat-bucket shaped cookie cutter. Keeping the thickness at 1/4″ helps ensure the cookies maintain their shape while baking.
Bake at 350°F (175°C) for 6–10 minutes, depending on cutter size, until the tops are no longer shiny. For a 3″ tall cutter, about 8 minutes worked well. If some cookies spread, re-cut them with the cutter immediately after removing the sheet from the oven while the cookies are still warm and pliable.
Second, make the royal icing.
For these cookies use royal icing thinned to a 20-second consistency: when you lift a spoonful and let it drip back into the bowl, the surface should reabsorb in roughly 20 seconds. If you’re new to royal icing, this medium flood consistency is ideal for piping outlines and flooding areas in one step.
Whip meringue powder (or powdered egg whites) and lukewarm water until frothy, then gradually add sifted powdered sugar while mixing until smooth. Adjust water sparingly to reach the target consistency and divide the icing for coloring.

Third, color and ice the cookies.
Allow baked cookies to cool completely before decorating. Divide the icing into three equal portions and a small fourth portion. Tint the larger batches in your bucket colors—green, purple, and orange work well for a Halloween palette—and tint the small portion black for faces and details.
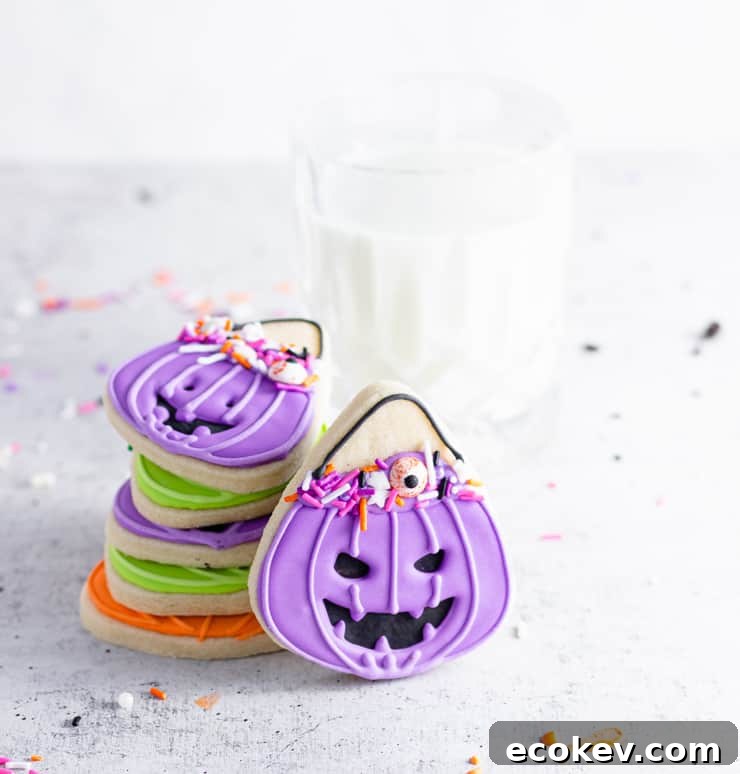
Start by brushing a thin layer of black icing onto the lower half of each cookie using a food-only brush. This creates the negative space for jack-o-lantern faces. Load green, purple, and orange into piping bags with a small round opening. Use these colors to pipe outlines for faces and bucket shapes over the black base, then flood the lower half with the same color.
Use a toothpick or a small tool in a swirling motion to help flood icing reach edges and smooth inside areas around facial outlines. When the surface has formed a light skin—about 30 minutes—return with the small piping bags used for outlines and add vertical lines from top to bottom to suggest bucket slats or texture.
Let the cookies dry and set for at least 8 hours or overnight to fully harden the royal icing.

Finish each cookie by piping a thin line of matching color along the top edge of the bucket, then pressing that edge into sprinkles so they adhere to the fresh icing. Use remaining black icing to pipe a thin handle across the top of the bucket. These finishing touches add texture and a playful, finished look.
Tips for success
- Plan ahead: Sugar cookie dough keeps in the refrigerator up to five days and freezes for up to six months. Thaw frozen dough in the fridge overnight before rolling.
- Prevent butter bleed: Cool cookies on a wire rack rather than leaving them on the hot baking sheet. Make sure they’re completely cool—overnight cooling helps the tops dry and reduces bleeding when iced.
- If cookies spread: Re-cut them immediately after removing from the oven while warm and soft for a clean edge.
- Mix colors slightly lighter: Royal icing darkens as it dries, so tint colors a little lighter than the final shade you want.
- Strong pigments help: Red and black are harder to develop; using concentrated gel color gives better results and less dyeing.
- Make extra icing: It’s easier to match colors when you have enough. Prepare a little more of each color than you think you’ll need.
- Pop air bubbles: Use a toothpick or a quilling tool to remove small bubbles before the icing sets.
- Storage: Store cooled, fully set cookies in an airtight container in a cool, dark place for up to three weeks.

Recipe
Treat Bucket Sugar Cookies

Colorful, festive sugar cookies shaped like treat buckets. Perfect for Halloween parties and cookie exchanges.
- Author: The Simple, Sweet Life
- Prep Time: 8 hours (including drying)
- Cook Time: 6–10 minutes
- Total Time: 8 hours 8 minutes
- Yield: about 24 cookies
- Category: Dessert
- Method: Baking
- Cuisine: American
Ingredients
For the sugar cookies:
- 2 sticks unsalted butter, at room temperature
- 1 cup granulated sugar
- 1 egg
- 1 tsp vanilla extract
- 3 cups all-purpose flour
For the royal icing:
- 1/4 cup meringue powder or powdered egg whites
- 1/2 cup lukewarm water
- 1 lb powdered sugar, sifted
- Optional: 1 tsp extract of your choice
- Food gel coloring in orange, green, purple, and black
Additional supplies:
- Sprinkles
- Piping bags
- Small food-only brush
Instructions
To make the sugar cookies:
- Beat the butter until smooth. Add sugar and beat until combined. Add the egg and vanilla and mix well.
- Scrape the bowl and add flour one cup at a time, mixing until a firm, non-sticky dough forms.
- Flatten dough into a disc, wrap, and chill for at least 1 hour.
- When chilled, knead lightly on a floured surface, roll to 1/4″ thickness, and cut with a candy corn or treat-bucket cutter.
- Bake at 350°F for 6–10 minutes until the tops are no longer shiny. Cool completely on a wire rack.
To make and use royal icing:
- In a mixer bowl combine meringue powder and lukewarm water; whip until frothy.
- Add sifted powdered sugar gradually and beat on medium. Stop periodically to scrape the bowl.
- Beat until you reach a 20-second flood consistency. Add flavoring if desired.
- Divide icing into three equal portions and a small fourth portion. Tint the larger portions orange, green, and purple; tint the small portion black.
- Brush a thin layer of black icing onto the lower half of each cookie.
- Pipe outlines of facial features with colored icing using small round tips, then fill the lower half of the cookie with the same color. Use a toothpick to spread icing to the edges as needed.
- After about 30 minutes, once the surface skins over, pipe vertical bucket lines and let cookies dry for at least 8 hours or overnight.
- Pipe a line of colored icing along the top edge, press into sprinkles, and pipe a thin black handle to finish.
Notes
- Make ahead: Dough can be refrigerated up to 5 days or frozen up to 6 months.
- Color tips: Mix colors lighter than your target shade—royal icing darkens as it dries. Use concentrated gel colors for deep hues.
- Match quantities: Make extra of each color to avoid running out and having to remix an exact shade.
- Air bubbles: Pop small bubbles before the icing sets with a toothpick.
- Storage: Store baked and fully set cookies in an airtight container for up to 3 weeks.
Nutrition
- Serving Size: 1 cookie
- Calories: 251
- Sugar: 28.8 g
- Sodium: 20 mg
- Fat: 7.8 g
- Saturated Fat: 4.9 g
- Carbohydrates: 43.7 g
- Fiber: 0.4 g
- Protein: 3.2 g
- Cholesterol: 20 mg
If you tried this recipe: Share your results by posting photos on social media and tagging your account or hashtag so others can see your cookies.
If you liked this, you might also enjoy:
- Candy corn swirl cookies
- Easy witch hat cupcakes
- Jack-o-lantern treat bucket cake