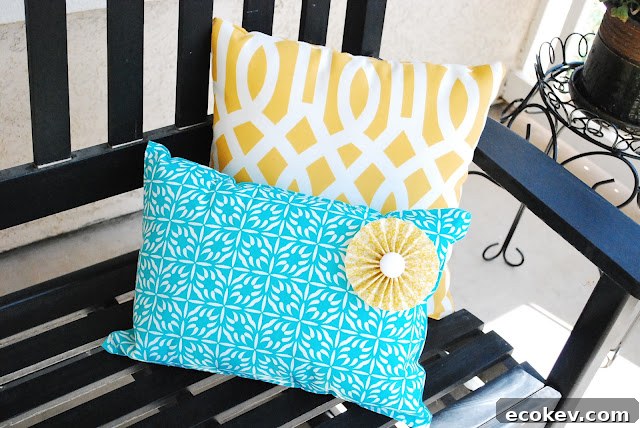
A few weeks ago I shared my budget-friendly porch makeover featuring bright, colorful pillows. The sunny yellow cushions came from Kmart, while the turquoise pillows were handmade from placemats. It was my first time turning placemats into pillows, and after discovering how quick and inexpensive the project is, I plan to make many more for upcoming holidays and seasonal refreshes.
Placemat pillows have been popular across craft blogs and social feeds, and for good reason. They’re a simple DIY that delivers a polished, store-bought look for a fraction of the price. I found my placemats for under $3 each, and the stuffing was already in my craft stash; most craft stores sell pillow stuffing or polyfil at reasonable prices. Using placemats makes it easy to get a consistent size and shape without cutting fabric, and placemat materials are often sturdy enough to hold up outdoors or in high-traffic areas.
Tools and materials are minimal: a seam ripper to open one edge of the placemat, stuffing (polyfil), straight pins, and either a sewing machine or a needle and thread for hand-stitching. If you prefer a no-sew option, heavy-duty fabric glue can work for some materials, but a stitched seam will be the most durable, especially for outdoor use.
Start by carefully opening the stitched seam on one side of the placemat with your seam ripper. Remove only enough stitches to create an opening large enough to insert the stuffing. For the placemats I used, half a standard bag of polyester stuffing filled each pillow nicely, but this will vary with placemat size and the level of firmness you prefer.
Work the stuffing in evenly, pushing it into corners and smoothing the surface so the pillow keeps a uniform shape. Pin the opening closed to hold the edges together, then sew the seam shut using a straight stitch. If the stuffing gets in the way, push it to the far side while sewing, then redistribute and fluff the pillow when the seam is secure.
Once your basic placemat pillow is finished, you can personalize it with trims and embellishments. I like adding fabric rosettes with a decorative button center to coordinate with the porch palette. If you want a professional-looking fabric-covered button, an i-top or similar button maker is handy, though I used an inexpensive alternative tool from my local craft store to achieve the same effect.
Fabric Rosettes Tutorial:
1. Iron lightweight interfacing to the wrong side of your fabric to give the petals body and stability.
2. Cut fabric strips 1–2 inches wide; wider strips make larger rosettes. The length of the strip determines the fullness of the flower.
3. Fold the fabric strip accordion-style or pleat it, then secure the ends together with craft glue or a few stitches.
4. Press the folded strip flat, then coil or fan it into a circular rosette shape and hot-glue the center layers to hold the form.
5. Finish by adding a fabric-covered button, bead, or small embellishment to the center for a polished look. Stitch or glue the rosette to the pillow front.
The blue-and-yellow color scheme transformed my porch into a bright, welcoming space. Guests have commented on how cheerful and fresh it feels, and I appreciate how easy it was to achieve a coordinated look on a tight budget. These placemat pillows are perfect for patios, porches, entry benches, or even adding color to indoor rooms. They’re quick to make, cost-effective, and customizable with trims, piping, or appliqués to match any seasonal décor.